
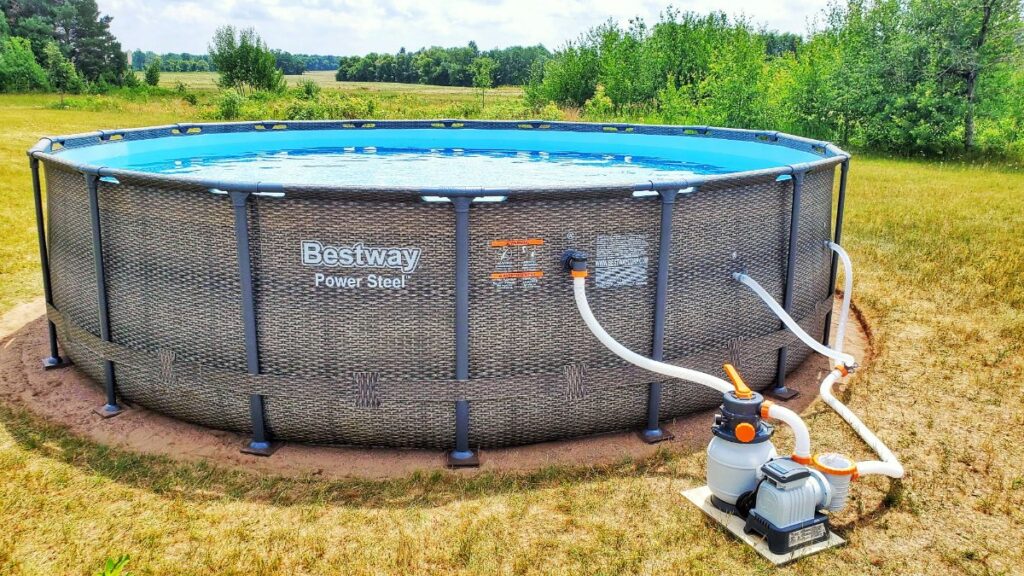
How to Install an Above Ground Pool – Easy Ultimate Guide
Making Your Backyard a Refreshing Oasis
Are you eager to transform your backyard into a summer haven for family fun and relaxation? Look no further than installing an above ground pool! With a bit of planning, some elbow grease, and this comprehensive guide, you’ll be well on your way to creating the ultimate outdoor escape. Together, we’ll make your pool setup a breeze! So, let’s dive in (pun intended) and get started on your above-ground pool installation journey!
What You’ll Need
Before you embark on your above ground pool setup journey, it’s essential to gather all the necessary tools and supplies. Having everything on hand will make the process more efficient and enjoyable. Below, you’ll find two lists: one for the tools you’ll need and another for the essential supplies to have at your disposal.
Tools You’ll Need
- Builder’s Level: A level is essential for ensuring the ground is perfectly flat, a crucial step for a stable pool foundation.
- Tape Measure: You’ll need this to measure and mark the pool’s location accurately.
- Shovel and Rake: To clear the area of debris, rocks, and vegetation and to help level the ground.
- Tamper or Compactor: Use this tool to compact the soil or sand after leveling to create a firm base.
- Garden Hose: You’ll need this for filling the pool with water once it’s assembled.
- Screwdrivers and Wrenches: To assemble the pool frame and secure various components.
- Utility Knife: For cutting open the box and the associated packaging.

Supplies You’ll Need
- Pool Kit: This includes the above ground pool frame, liner, top rails, and all necessary hardware. Ensure it’s the right size and style for your needs.
- Pool Pump and Filter System: Choose a filter pump that matches the size of your pool and provides adequate circulation and filtration.
- Ground Cloth or Pool Floor Padding: (Optional)This can add a cushioned layer beneath the pool liner to protect it from damage.
- Pool Base Material: Typically, this is sand or foam pads and is used to create a level surface for the pool setup.
- Sand (if required): If the manufacturer recommends using leveling sand as the base material, make sure to have enough on hand.
- Ground Stakes or Blocks: These are used to secure the pool frame and prevent shifting.
- Water Source: Ensure access to a water source, usually a garden hose, for filling the pool.
Choosing the Right Location
Pro Tip: Before you begin, check local zoning laws and regulations regarding pool installation to ensure compliance. You may need a permit.
Selecting the ideal location for your above-ground pool is a pivotal decision that can significantly impact your overall swimming experience and the pool’s long-term performance. In this section, we’ll delve deeper into each consideration to help you make an informed choice:
1. Assess the Terrain
Understanding Your Landscape: Begin by thoroughly examining your backyard’s topography. Look for a level area that’s free from slopes, rocks, and tree roots. A flat surface is crucial for the stability and safety of your above-ground pool.
Clearing Obstacles: Take the time to remove any obstacles such as large rocks or tree roots in the chosen area. These obstructions can not only disrupt the pool’s foundation but also cause damage to the pool liner over time.
Pro Tip: Consider hiring a professional landscaper or excavation service if you encounter challenging terrain that requires significant modifications.
2. Sunlight Exposure
Bask in the Sunlight: Adequate sunlight exposure is key to creating an enjoyable swimming experience. Choose a location that receives ample sunlight throughout the day. Here’s why sunlight matters:
- Water Comfort: Sunlight warms the water, making it more comfortable for swimming, even on cooler days.
- Algae Control: Sunlight helps maintain water quality by reducing algae growth. A well-lit pool is less likely to develop algae-related issues.
- Enhanced Aesthetics: Sunlight enhances the visual appeal of your pool area, creating a more inviting atmosphere.
3. Get a Permit
Know the Local Regulations: Be aware of your local regulations and ordinances regarding above-ground pools. Some cities or municipalities may require a permit for pool installation. Familiarize yourself with these regulations to ensure compliance.
Safety Measures: In addition to permits, some areas may mandate specific safety features, such as a fence or pool cover. It’s essential to understand these requirements and incorporate them into your pool setup to ensure both safety and legal adherence.
4. Call 811 “Call Before You Dig”
Underground Utility Awareness: Safety should always be a top priority during your above-ground pool installation. Avoid building your pool above electrical, plumbing, or other utility lines. Once you’ve selected a location, take the proactive step of calling 811, the “Call Before You Dig” hotline.
Utility Line Marking: When you contact 811, they will send a technician to your location to mark any potential utility lines underground. This crucial step ensures that you’re aware of any hazards and can plan your pool installation accordingly.
Pro Tip: Marked utility lines should be respected during excavation and site preparation to prevent accidents or damage to essential services.
5. Proximity to Utilities
Power and Water Accessibility: Ensure that your chosen pool location is conveniently located near a power source for the pool pump and filter. A power source within reasonable proximity minimizes the need for extensive electrical work, reducing installation costs.
Water Supply: Consider the availability of a water source for filling the pool. A nearby hose connection or access to a water supply simplifies the filling process and reduces the time it takes to get your pool up and running.
6. Accessibility
Easy Access Equals Enjoyment: Think about how easy it will be to access the pool from your home. A convenient entry point enhances safety and overall enjoyment. Consider the following:
- Proximity to the House: The closer the pool is to your home, the easier it will be for you and your family to access. This proximity reduces the distance you need to travel for refreshments, restroom breaks, or any forgotten poolside items.
- Pathway Design: Plan for a well-defined and safe pathway leading from your home to the pool. Ensure it’s free from obstacles and tripping hazards.
Site Preparation
As you embark on the site preparation phase of your above-ground pool installation, it’s essential to pay close attention to detail. Proper site preparation not only ensures a stable foundation but also contributes to the longevity and safety of your pool. Let’s dive deeper into each step:
1. Clear the Area
Thorough Debris Removal: Start by thoroughly clearing the chosen location of any debris, rocks, or vegetation. Imagine creating a clean canvas for your pool to rest upon. Remove all obstacles that could hinder the pool’s stability or damage the liner.
Pro Tip: If manual labor isn’t your thing, consider renting a small excavator or hiring a landscaping service for efficient debris removal, especially if the area is significantly overgrown or contains large rocks.
2. Choose the Center Point
Determining the Center: For round pools, pinpoint the center of your pool’s future location. Pound a sturdy stake into the ground, ensuring it’s secure and level. Attach a string to the stake, with its length equal to half the pool’s diameter. As you walk in a circle around the stake, mark the ground with spray paint to outline where the pool will sit. This will give you a guide on where to clear the sod and debris.
Adding Extra Space: To provide ample room for assembly, maintenance, and safety, add an additional 6 to 12 inches beyond the marked outline. This extra space ensures you have enough room to maneuver around the pool.
3. Remove Sod
Thorough Sod Removal: Prior to installing your pool, it’s crucial to remove the existing sod or grass from the designated area. This step serves several purposes:
- Prevents Weeds and Roots: Eliminating grass, weeds, and their underlying root systems minimizes the risk of vegetation growing under your pool, which can damage the liner over time.
- Promotes Level Ground: Sod removal ensures the pool’s base rests evenly on the soil, preventing lumps or unevenness that could affect the pool’s stability.
Tools for Sod Removal: To make the task easier, you can use either a shovel or a sod-cutter. Ensure that you remove the sod and grass down to the bare soil.
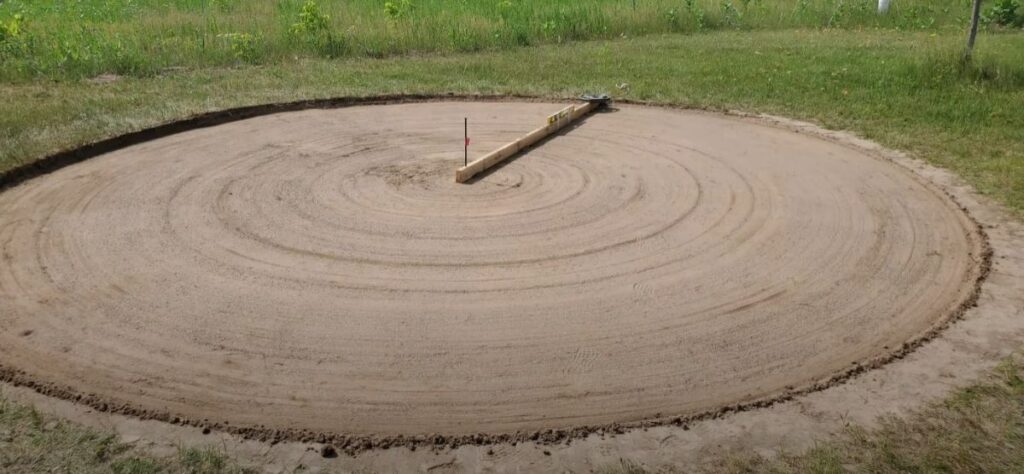
4. Level the Ground
Ensuring a Level Surface: Achieving a level surface is a critical aspect of site preparation. Use a builder’s level or a laser level to assess the evenness of the ground. Pay close attention to this step, as any discrepancies can lead to an unstable pool. Use a 10-foot long 2×4 and drill a vertical hole through one end. Put a 43-inch fencing spike through it on one end and into the center of your pool site.

Attach a cord to the other end and tape a carpenter’s level to the top of it. Drag the 2/4 around in circles while watching the level, in order to level out your spot. Add leveling sand as necessary.
Adjustment as Necessary: If you notice areas of unevenness or slopes during your level assessment, take the time to adjust the ground. You can achieve this by adding or removing soil as needed. Tamp the soil down firmly to create a stable base. Put a weight on the 2×4 in order to hold it down, if necessary.

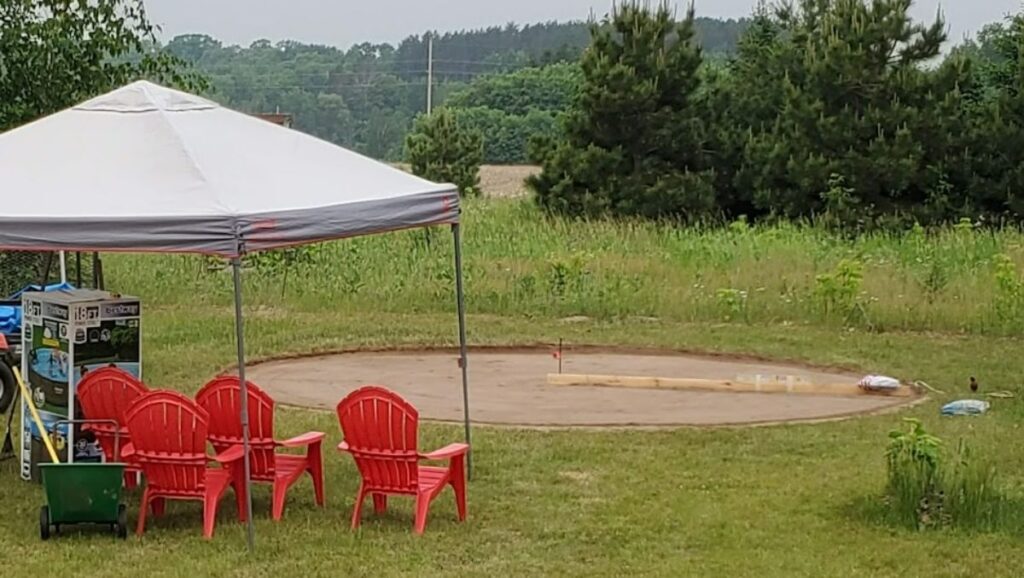
5. Create a Base
Cushioned Foundation: Lay down a suitable pool base material, such as sand or foam pads, to provide a cushioned surface for the pool liner. This critical layer not only protects the liner from potential damage but also ensures a comfortable and safe swimming environment.
Long-Term Consideration: For those planning to keep their above-ground pool for an extended period, consider more permanent base options, such as pouring a concrete slab or laying down patio bricks. These provide exceptional stability and longevity to your pool’s foundation.
6. Install Ground Cloth
Additional Layer of Protection: To further safeguard your pool liner, place a ground cloth or pool floor padding on top of the base material. This extra layer acts as an additional buffer, reducing the risk of abrasions or punctures to the liner.
Pool Assembly
With your site well-prepared and the groundwork laid, it’s time for the exciting phase of assembling your above-ground pool. This is where the dream of your personal aquatic oasis begins to take shape. Having a few friends by your side can make the process smoother, especially when dealing with the pool frame components, which can sometimes be a bit unwieldy.
Not sure how to maintain your above ground pool? Download our free Pool Maintenance Checklist PDF!
1. Lay the Liner in the Sun
Preparation is Key: Before you start assembling the pool, lay the pool liner in direct sunlight for a short period. This helps the liner become more pliable and easier to work with during installation.
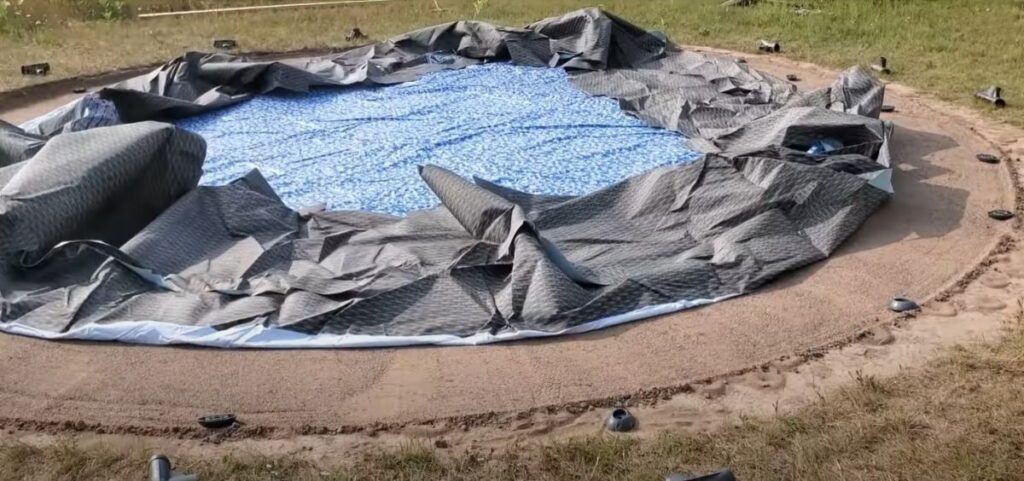
Smooth Out Wrinkles: While the liner is sunbathing, inspect it for any existing wrinkles or creases. If possible, smooth them out to ensure a wrinkle-free fit when you install it inside the pool frame.
Position the Liner: Once it is warmed up, lay the liner at the center of your site. Position the holes for the filter pump at the right location. This may require rotating the pool liner until the filter pump inlet and exit holes are pointed toward the side where you want the filter pump to sit.
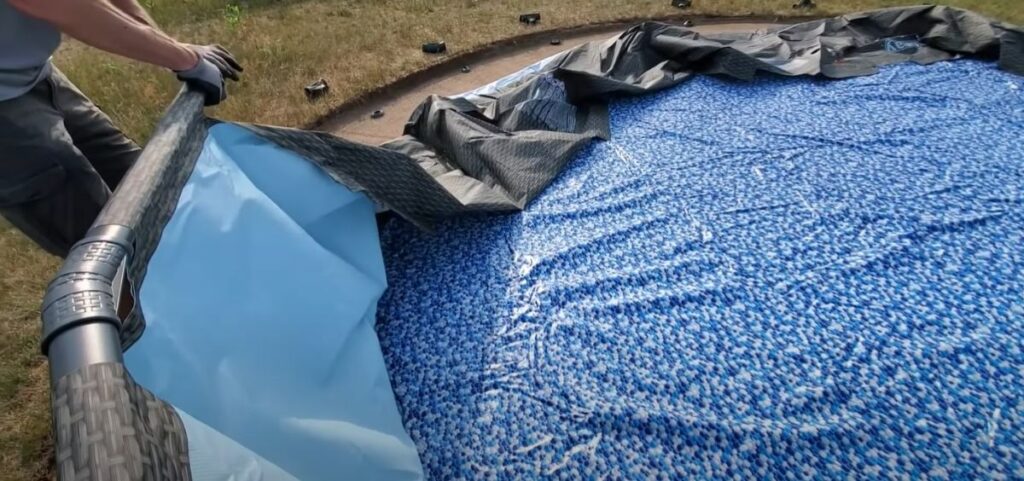
2. Assemble the Top Rail and Liner
The Framework Takes Shape: Begin the assembly by connecting the top rail components. The top rail forms the upper edge of the pool and provides support for the liner.
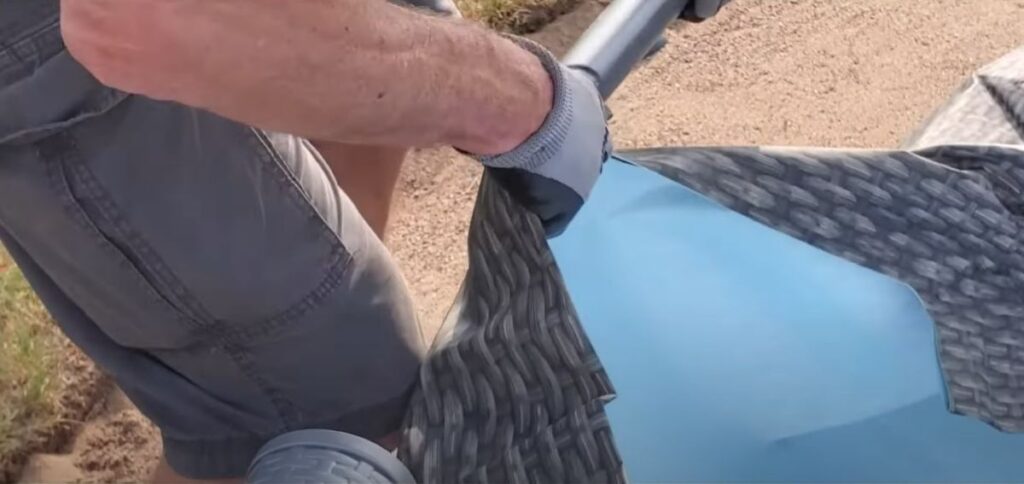
Attach the Liner: As the top rail takes shape, slide the supports through the corresponding loops in the pool liner.
Pro Tip: Enlist the help of your friends to hold the frame and liner in place as you attach the top rail. Their assistance ensures the liner remains properly positioned during this critical step.
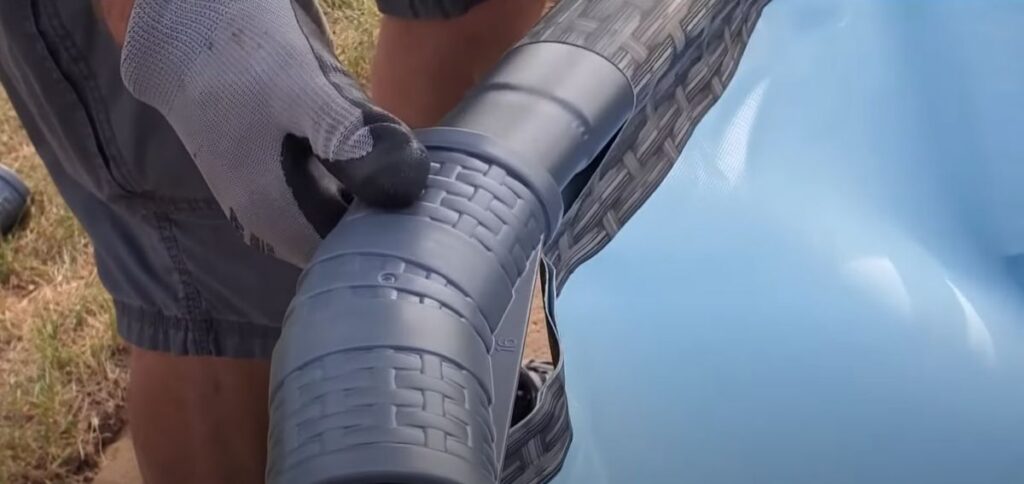
3. Install the Support Legs
Adding Structural Integrity: Now, it’s time to install the support legs. Connect the legs to the top rail and secure them in place.
Uniform Spacing: Ensure that the support legs are evenly spaced around the pool’s perimeter. This uniformity helps distribute the weight of the water evenly.

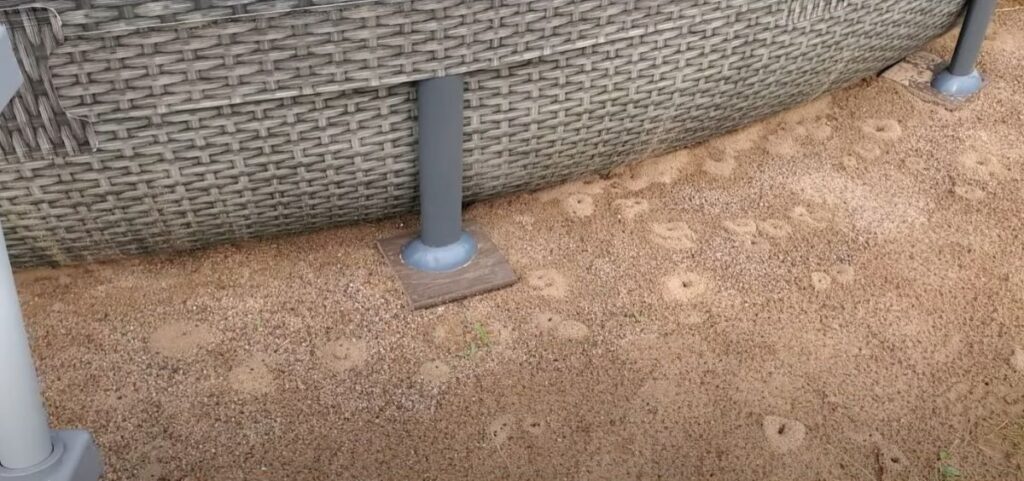
4. Place the Legs on a Sturdy Base
Setting a Solid Foundation: Before you proceed, make sure the legs have a sturdy base to rest on. This is vital for the pool’s overall stability. We used 5″ x 5″ pieces of decking material under each foot to help distribute the weight and make sure that the legs didn’t sink.
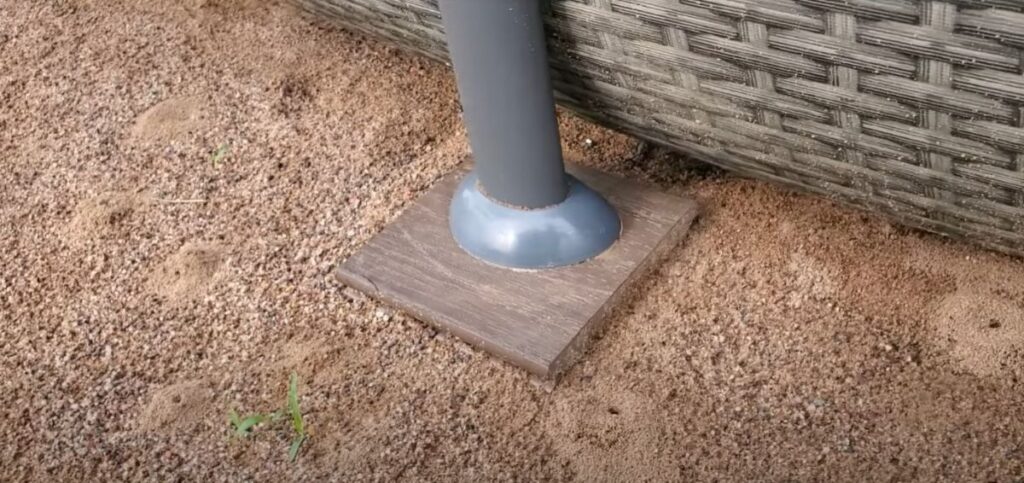
Solid Ground: The ground should be level and well-compacted beneath each support leg. Use a builder’s level to confirm that the legs are resting on a flat and stable surface.
Pro Tip: For added support and longevity, consider placing concrete pavers or patio blocks beneath each support leg. This prevents settling and helps maintain a level pool.
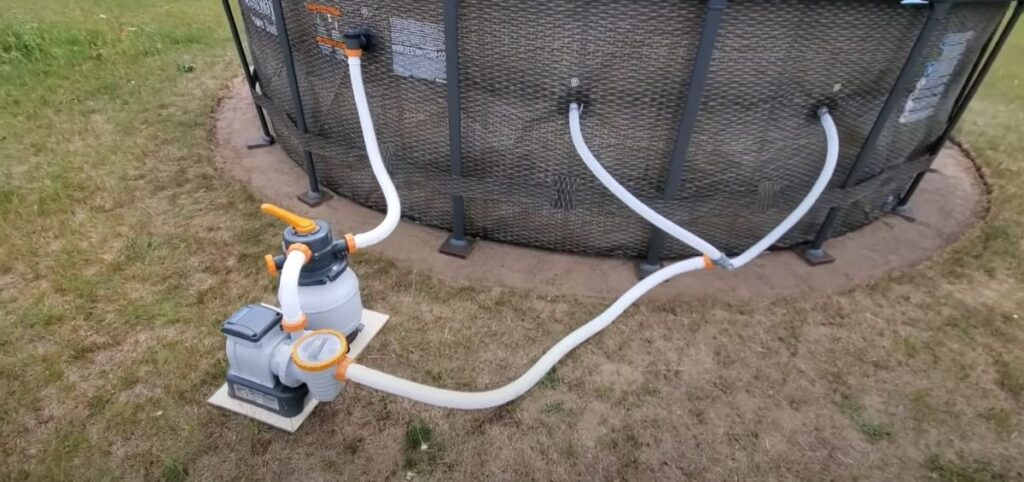
5. Install the Filter System
Strategic Positioning: Place the pump and filter system in a location near the pool that is both accessible and stable, but not in the way of eager swimmers, usually this means rotating the pool so that the pump is at the “back.” Ensure it is level and securely mounted.
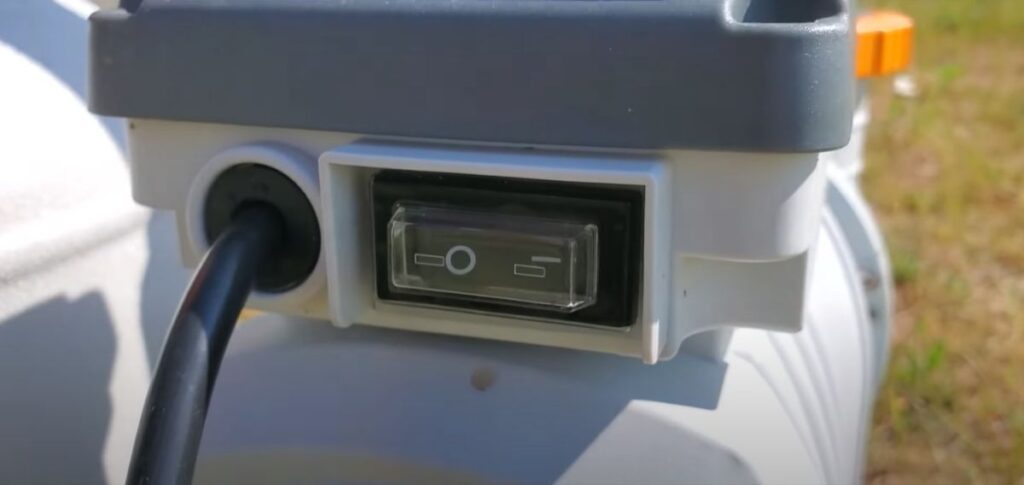
Plumbing and Electrical Connections: Carefully connect the plumbing from the pool to the pump and filter system, following the provided instructions. If electricity is required, adhere to electrical safety guidelines during installation and ensure proper grounding.

Pro Tip: To maximize energy efficiency and maintain water quality, consider adding a timer to your pump system. Regularly clean and maintain the filter to ensure efficient water circulation and filtration.
Filling with Water
With your above-ground pool structure assembled, it’s time to bring it to life by filling it with water. This phase of the installation process requires some patience and attention to detail. Here’s how to go about it:
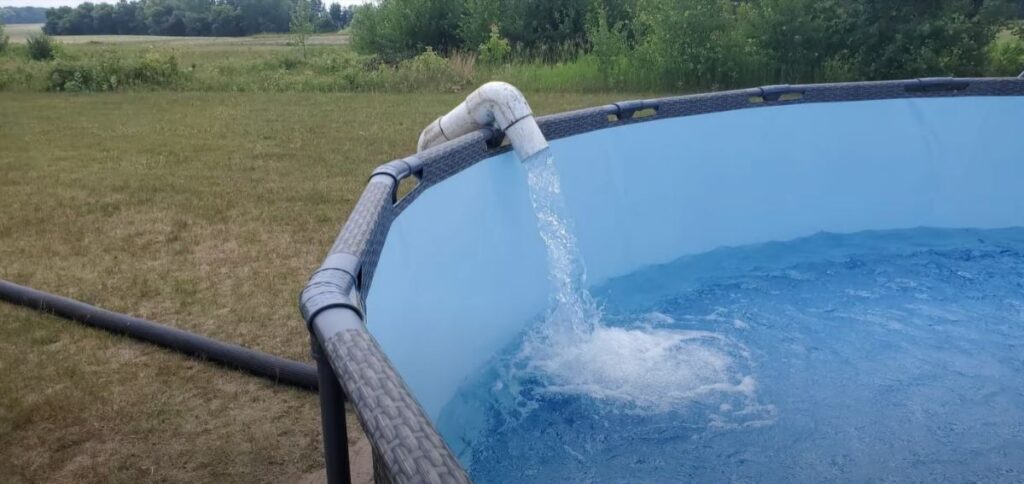
1. Water Source
Connecting the Hose: Begin by connecting a garden hose to your water source. Ensure that the hose is long enough to reach your pool comfortably.
The Waiting Game: Be prepared for a bit of patience, especially if you have a larger pool. Filling an above-ground pool can take some time, and the duration depends on several factors, including your water source’s water pressure.
Estimating Fill Time: To estimate the fill time, you can use a simple calculation. The average garden hose provides a flow rate of approximately 12 gallons per minute. Use our Pool Volume Calculator to calculate the number of gallons your pool will hold, then divide by 720 to get the number of hours it will take to fill your pool.
For example, a round pool 18ft in diameter and 4 ft deep holds around 7,500 gallons of water, and So, for a 7,500-gallon pool, it may take approximately 625 minutes, or just over 10 hours, to fill it completely.
Pro Tip: Consider purchasing water from a reliable source. Pool water companies exist that will bring a tanker truck to your home and fill your pool with chlorinated water in a matter of minutes!
2. Monitor Water Level
Keeping It Even: As the pool fills, keep a vigilant eye on the water level. The fact that the filling process takes so long can make it easy to forget or neglect. Make sure the hose is secured and won’t fall out of the pool while no one is watching.
Smooth out the Wrinkles: It can be almost impossible to create a flat surface in the liner without any water in it. Fill the pool to about 2-3 inches deep, then get inside and smooth the floor liner to remove any wrinkles. The small amount of water will keep the liner smooth and in-place.

Pro Tip: Once the pool is full of water it will be nearly impossible to smooth out wrinkles in the floor. Smooth the wrinkles before the pool is completely full.
Adjust the Support Legs: When the water is about 1 foot deep, go around the outside of the pool and adjust the position of the support legs. Make sure the legs are straight, not crooked, and pull them out slightly, as the weight of the water will naturally force them outward as the pool fills with water. Once the pool is full, it will be almost impossible to adjust the position of the legs or the support pieces under the feet.
Continue filling the pool until it is full of water, to about 6 inches below the blue/brown line on the inside of the pool.

First Running the Pump
Congratulations, you’re almost there! It’s time to start up the pump and get your pool ready for swimming:
1. Prime the Pump
Ensuring Proper Circulation: Follow the manufacturer’s instructions carefully to prime the pump. Priming involves filling the pump and filter system with water to ensure proper water circulation.

Confused by the Icons on the Pump?!? Check out our Cheat Sheet on Filter Pump Settings!
Proper Priming Steps: Typically, priming includes the following steps:
- Open the pump’s air relief valve, or loosen the filter basket cover, to release any trapped air.
- Ensure all valves are set to the correct positions for circulation (open).

- Turn on the pump and allow it to run until you see a steady flow of water from the return jets.
2. Turn on the Pump
Initiating Filtration: With the pump primed and ready, it’s time to switch on the pump and filter system. This marks the beginning of the pool’s water circulation and filtration.
Initial Run Duration: Allow the pump and filter system to run for several hours during the initial cycle. This period helps filter out any impurities or debris that may have entered the pool during the filling process.
Pro Tip: If you have a sand filter, be sure to run a “Backwash” before allowing the filter pump to pump water into your pool. Why? The first time you run a sand filter, it will shoot sand into your pool! Run a Backwash and Rinse step to ensure you keep your pool free from loose sand.
Common Pitfalls to Avoid When Setting Up an Above Ground Pool
Setting up your above-ground pool is an exciting venture, but like any project, it comes with its fair share of potential pitfalls. To help you navigate this process smoothly, we’ve compiled a list of common pitfalls to avoid:
1. Neglecting Proper Ground Preparation
Pitfall: Rushing through site preparation or neglecting it altogether.
Solution: Take your time to clear the area, level the ground, and create a solid base. Skipping these steps can result in an unstable pool, potential damage such as rips or tears from rocks/roots/sticks, and even voiding your warranty.
2. Underestimating Pool Size
Pitfall: Selecting a pool that’s too large for your available space.
Solution: Measure your yard carefully and choose a pool size that fits comfortably. Overcrowding can lead to safety hazards, restricted access, and a cramped pool experience.
3. Improper Pool Assembly
Pitfall: Incorrectly assembling the pool components.
Solution: Follow the manufacturer’s instructions meticulously. Overlooking steps or misaligning parts, especially the upper rim and legs, can compromise pool integrity and safety.
4. Skimping on Pool Base
Pitfall: Not investing in a proper pool base material.
Solution: Use recommended pool base materials like sand or foam pads to cushion the pool liner. Skipping this step can lead to liner damage and potential leaks.
5. Overlooking Safety Measures
Pitfall: Neglecting safety barriers and pool rules.
Solution: Install safety barriers like fences and gates and establish clear pool safety rules. Safety should always be a top priority to prevent accidents and ensure a worry-free pool experience.
6. Ignoring Local Regulations
Pitfall: Not checking local ordinances and regulations.
Solution: Research and comply with local laws regarding pool installation, safety barriers, and permits. Non-compliance can lead to costly fines and legal issues, and you may have to remove your pool!
7. Skipping Regular Maintenance
Pitfall: Ignoring routine pool maintenance.
Solution: Develop a maintenance schedule and stick to it. Regular cleaning, filter checks, and water testing are crucial for long-term pool enjoyment.
8. Overcrowding the Pool
Pitfall: Allowing too many swimmers at once.
Solution: Follow the pool’s recommended capacity guidelines to prevent overcrowding. Overloading the pool can lead to water quality issues and safety hazards.
By steering clear of these common pitfalls, you’re well on your way to a successful above-ground pool setup and a worry-free summer of poolside fun. Remember, meticulous planning and attention to detail will help you enjoy your pool for years to come.
Enjoy Your Oasis!
And there you have it—a beautifully installed above-ground pool ready for hours of family fun and relaxation in your own backyard oasis. Remember, safety is paramount, so always supervise children and follow pool safety guidelines. Now, go ahead and dive in, make lasting memories, and enjoy the summer to the fullest!
Your backyard retreat awaits!


